

It is normal for us to transfer files between our devices in our daily lives. Among these data transfer requirements, the necessity to understand how to transfer files from Mac to an iPhone or an iPhone to a Mac appears to take precedence. This is most likely because it is less known and, thus, more challenging.
However, these methods below will assist you in transferring files from your Mac to your iPhone or sending files from your iPhone to your Mac.
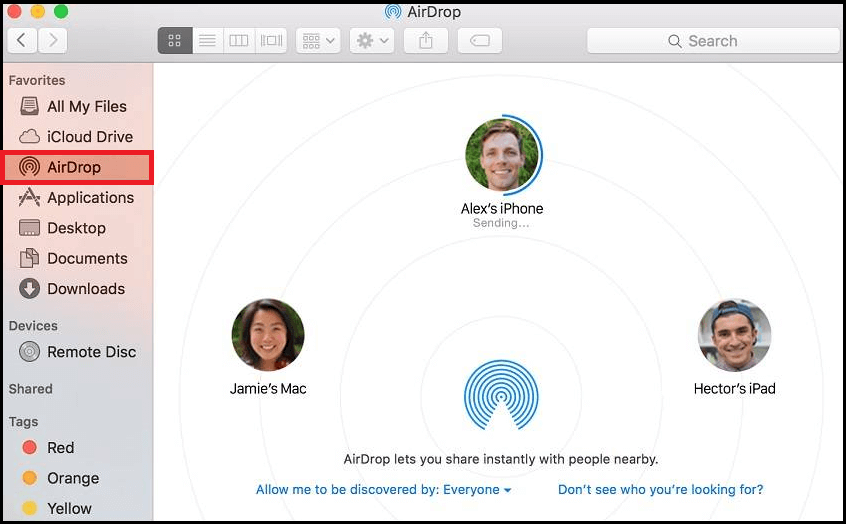
How To Send Files Between A Mac and An iPhone?
There are various ways to transfer files between Mac and iPhone, and we are listing them down. You can select anyone, whichever you are comfortable.
1. Using AirDrop
AirDrop allows easy transfer of files from iPhone to Mac and vice versa. All you need to do is enable AirDrop on both the devices and switch on Bluetooth and Wi-Fi. With AirDrop, you will be able to transfer different types of files, including photos, videos, locations, and websites. Below are steps on how you can transfer files between iPhone and Mac using AirDrop.

Step 1: Switch on Airdrop your iPhone,
Step 2: Open “Control Center” and switch on Bluetooth and Wi-Fi.
Step 3: Choose AirDrop.
Step 4: Set the phone to “Everyone/Contacts Only“.
For Mac
Step 1: Head to “Finder” followed by “Go” and choose AirDrop.
Step 2: Switch on Wi-Fi and Bluetooth.
Step 3: Enable AirDrop.
Step 4: Switch on the option of “Allow to be discovered by” to “Contacts Only/Everyone“.
Step 5: Tap the “Share” button on the file and choose AirDrop.
Step 6: Search for the recipient and tap “Done”.
2. Using Email
Using email is a good method to send small files to an iOS device. All you need to do is create a new email addressed to yourself and add the file(s) as attachment to the message. Click on the attachment in the message to download and then launch the file. Depending on the file type, you may or may not be able to open files on your device. Naturally, you’ll want to do this when you’re on a Wi-Fi network to avoid potentially using a lot of cellular data if you’re sending large files.
3. Dropbox Allows You to Transfer Files From Your Mac to Your iPhone or Vice Versa
Other cloud storage services, including Dropbox and Google Drive, serves as a perfect way to transfer files from Mac to iPhone. As an example, consider Dropbox.
To exchange files between an iPhone and a Mac using Dropbox, follow these steps:
Step 1: Download Dropbox on your iPhone and Mac.
Step 2: Install Dropbox and create your Dropbox account.
Step 3: Upload the items to Dropbox on your computer.
Step 4: Launch the Dropbox app on your iPhone and download the files.
4. Using iCloud Drive
In order to use iCloud Drive, you must first set it up.

From an iPhone to Mac:
1. Launch the file you want to share and click the share icon, the square icon with an arrow pointing up.
2. Swipe down and click on Save to Files.
3. In the new menu that appears, choose iCloud Drive.
4. Click Save.
5. Launch Finder on your Mac and click on iCloud Drive. Your file will be in there.
From a Mac to iPhone:
1. Copy the file that you want to share into the iCloud Drive folder in Finder.
2. On your iPhone, Launch the Files app and choose iCloud Drive from the list of available locations.
3. Click on the three horizontal dots on the top right corner of the screen and tap on Select.
4. Click on the file that you want to transfer.
5. Click on the Share button and select how you wish to transfer the file. This could be selecting Save Image if it is a picture or another option for a different type of file.
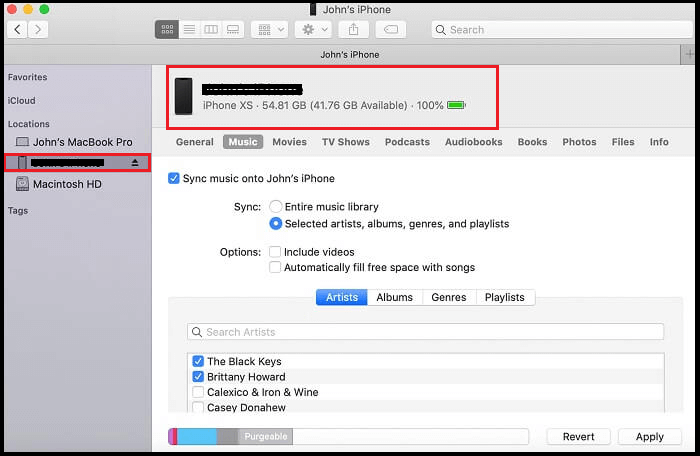
5. How to Transfer Files from Mac to iPhone with iTunes
Apple has made iTunes the standard file sharing and device management tool for the iPhone on Mac and Windows. It lets you connect your Mac to your iOS device.

You can follow these steps below.
1. Connect your iPhone to your Mac through a USB cable.
2. If you’re using an older version of macOS, you’ll find that iTunes opens automatically on your Mac.
3. If you have the latest macOS Monterey or later, open a Finder window.
4. Find your device from the left pane and click on it.
5. You can get music, videos, movies, audiobooks, books, files, and more right from the window.
6. Go to the “Files” tab and you can find the file systems of supported applications.
However, if you want to transfer any files from Mac to iPhone’s Files app, you can copy them directly to the file system to any app.
The copied files can be found in the corresponding directory of the Files application on the iPhone.
6. Syncing
Syncing is an easy way of transferring files between your iPhone and Mac. You can sync for different items like music, videos, books, and podcasts. When you happen to use the latest version of Mac OS Catalina, you can easily sync using Wi-Fi or a USB cable.

- Launch iDevice from Finder on Mac after connecting to the iPhone through USB.
- Select files to share to the phone or choose any files from the phone to load to your computer.
The same can be done wirelessly as well:
- Connect both devices to the same WiFi network and open General.
- Tap on “Show this device when on Wi-Fi,” and hit Apply.
7. Copy Audio or Video Files with Waltr
If you are want to copy any type of video or audio file from one iOS device to another which requires conversion, Waltr will serve as the perfect one. It can convert and transfer all types of fires so that you can easily view or watch them on the respective app. The app adopts Smart Adaptive Conversion which will convert the files that lets you have access to your iPhone.
Step 1: Download and install Waltr on your computer.
Step 2: Open Waltr.
Step 3: Connect your iPhone using a USB.
Step 4: Look for the phone.
Step 5: Tap the “Select Files” button to add the files. You can simply drag and drop directly.
Step 6: On your iPhone, search for the files in their respective apps.
In Conclusion, We have explained all the possible ways through which you can transfer any file from your Mac to your iPhone and vice versa instantly. You have to see which method you are comfortable with and use it accordingly. However, you should be aware of them all so that you can use them whenever required.


