Once you know how to blur a background in Photoshop, friends photobombing and strangers walking into shot will never be a problem again. Blurring a background is the perfect technique to make sure that everyone who sees your pictures focuses on exactly what you want them to.

In this article, You will learn about selections, Layer Masks, Smart Objects, and the Tilt-Shift Blur to blur your photo’s background.
1. Start the process by duplicating your image layer and renaming the duplicate layer to “Foreground.”

You can use the keyboard shortcut Ctrl J (Windows) or Command J (macOS) or right-click to duplicate.
2. The next step is to remove the background from the main subject to avoid edge halos upon blurring the image, and to give you more flexibility when masking the Foreground element.

To create a selection with the latest version of Photoshop, choose Select > Subject and allow Adobe Sensei, Photoshop’s Artificial Intelligence (AI), to study the entire image, find the subject, and create a selection out of it.
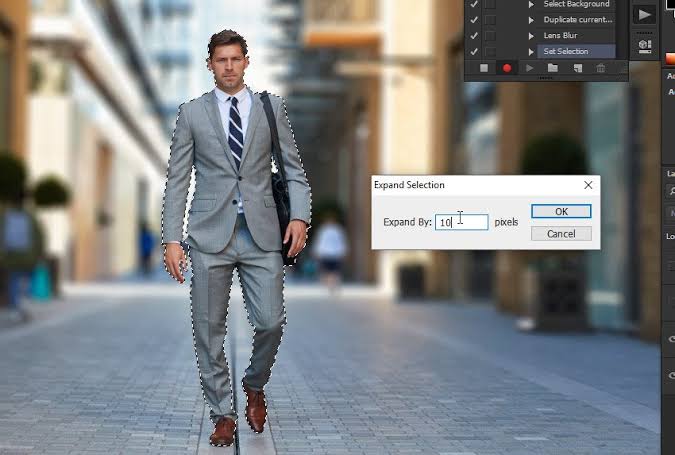
3. To avoid cutting off the edges of your image, click on Select, then modify and then expand.

4. On the Edit tab, click Content-Aware Fill. The subject of your image should now be bordered by a dotted line.
5. One important step on how to blur backgrounds in Photoshop is removing the background from the Model layer.
At this point, you can focus on the Foreground layer and disable the Background layer and its copy.
6. With the selection still active, apply it as a Layer Mask by clicking on the New Layer Mask icon.
7. Disable the two background layers by clicking the eye icon next to each. On your subject layer, add a Layer Mask.
8. With the Layer Mask selected, select the Filter tab, then click Other and then Minimum and contract the mask by one pixel more than you expanded by. The edges of the image should now be clean.
9. Right-click the copy of the background layer and convert it into a Smart Object. Enable the Subject Layer by selecting the eye again.
10. Select the Filter tab, then Blur Gallery and then select Tilt-shift.
11. Make use of the slider to adjust the blur’s thickness and adjust the position by dragging the lines on the image.
In conclusion, The method mentioned above is not a complicated process, but it’s a very useful one, If something still doesn’t look right after blurring the background you could even delete it and insert a whole new one.


