Home Blog Page 2

How to Connect Chromebook to Your TV

0

Connecting your Chromebook to a TV can enhance your viewing experience by allowing you to mirror your screen or extend your display. Here’s a guide on how to connect your Chromebook to your TV using different methods:

Using an HDMI Cable:

1. Check Ports Compatibility:

Ensure both your Chromebook and TV have an HDMI port for a wired connection.

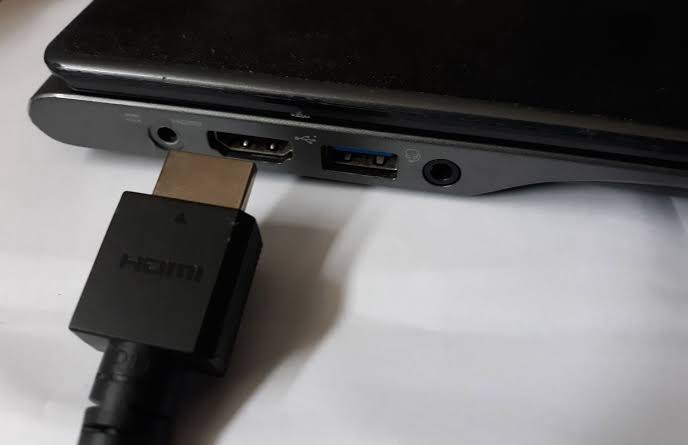
2. Connect HDMI Cable:

Plug one end of the HDMI cable into the HDMI port on your Chromebook and the other end into an available HDMI port on your TV.

3. Switch TV Input:

Change your TV input source to the HDMI port connected to your Chromebook to view the content on your TV.

Using Chromecast:

1. Set Up Chromecast:

Connect your Chromecast device to your TV and ensure it’s on the same Wi-Fi network as your Chromebook.

2. Cast Your Chromebook Screen:

On your Chromebook, click on the clock in the bottom right corner, select the Cast icon, and choose your Chromecast device to start casting your screen to the TV.

Using Wireless Display (Wi-Fi Direct / Miracast / AirPlay):

1. Check Wireless Display Support:

Confirm if your TV supports Wi-Fi Direct, Miracast, or AirPlay for wireless screen mirroring.

2. Turn on Wireless Display on TV:

Enable the wireless display feature on your TV.

3. Connect from Chromebook:

On your Chromebook, go to Settings > Connected devices > Cast and select your TV from the list of available devices for wireless screen sharing.

Using HDMI to USB-C Adapter (For USB-C Chromebooks):

1. Get HDMI to USB-C Adapter:

Purchase an HDMI to USB-C adapter if your Chromebook has a USB-C port.

2. Connect Adapter:

Plug the HDMI end of the adapter into your TV and the USB-C end into your Chromebook.

3. Adjust Display Settings:

Configure the display settings on your Chromebook to extend or mirror the screen to the TV.

In Conclusion, Whether using an HDMI cable, Chromecast, wireless display, or an HDMI to USB-C adapter, connecting your Chromebook to your TV opens up a new world of possibilities for viewing content on a larger screen. Experiment with these methods to find the one that best suits your needs and preferences.

- Advertisement -

How to Fix the ‘No SIM Card Installed’ Error on iPhone

0

Encountering the ‘No SIM Card Installed’ error on your iPhone can be frustrating, but there are several troubleshooting steps you can take to address this issue. Here’s a guide to help you fix the ‘No SIM Card Installed’ error:

Steps to Fix ‘No SIM Card Installed’ Error:

1. Restart Your iPhone:

Power off your iPhone, wait for a few seconds, then turn it back on. Sometimes, a simple restart can resolve temporary glitches causing the error.

2. Remove and Reinsert the SIM Card:

  • Turn off your iPhone and use the SIM card ejector tool (or a paperclip) to remove the SIM card tray.
  • Carefully take out the SIM card, make sure it’s clean, then reinsert it properly into the tray and put it back into your iPhone.

3. Check for SIM Card Damage:

Inspect the SIM card for any physical damage like scratches or bends. If damaged, contact your carrier for a replacement SIM card.

4. Update iOS:

Ensure your iPhone is running the latest version of iOS by going to Settings > General > Software Update. Updates often include bug fixes that can resolve SIM card-related issues.

5. Reset Network Settings:

Go to Settings > General > Reset > Reset Network Settings. This can help reset network configurations and may resolve the SIM card error.

6. Check Carrier Settings:

Ensure that your carrier settings are up to date. Go to Settings > General > About. If an update is available, you’ll be prompted to install it.

7. Contact Your Carrier:

If none of the above steps work, contact your carrier’s customer support. They can check if there are network issues or verify if there’s a problem with your SIM card or account.

8. Update Carrier Settings Manually:

You can manually update carrier settings by going to Settings > General > About. If an update is available, a prompt will appear to update.

In Conclusion, By following these troubleshooting steps, you can address the ‘No SIM Card Installed’ error on your iPhone and potentially resolve the issue causing the error message. Whether it’s a simple restart, checking the SIM card, updating iOS, or contacting your carrier, taking these steps can help you get your iPhone back in working order.

- Advertisement -

How to Back Up Your iPhone to an External Hard Drive

0

Backing up your iPhone to an external hard drive is a safe way to ensure your data is securely stored and easily accessible. Here’s a guide on how to back up your iPhone to an external hard drive using iTunes on a Mac:

Steps to Back Up iPhone to External Hard Drive:

1. Connect Your External Hard Drive:

Connect your external hard drive to your Mac using a USB cable or other appropriate connection method.

2. Open iTunes:

Launch iTunes on your Mac. If you don’t have iTunes installed, you can download it from the Apple website.

3. Locate iTunes Preferences:

In iTunes, go to the menu bar at the top of your screen and click on iTunes > Preferences.

4. Change iTunes Backup Location:

  • Click on the Devices tab within Preferences.
  • Hold down the Option (Alt) key, then click on Change next to “Backup location.”
  • Browse to and select the folder on your external hard drive where you want to store your iPhone backups. Click Select.

5. Backing Up Your iPhone:

  • Connect your iPhone to your Mac using the USB cable.
  • In iTunes, click on the device icon that appears near the top left corner of the iTunes window.
  • Under the Backups section, click on Back Up Now to start backing up your iPhone to the external hard drive.

6. Verify Backup Location:

  • After the backup process is complete, you can verify that the backup was stored on your external hard drive by checking the designated backup location.

Additional Tips:

  • Ensure your external hard drive has enough storage space to accommodate the iPhone backup.
  • Regularly back up your iPhone to prevent data loss in case of device damage or data corruption.
  • Consider encrypting your iPhone backups for added security and privacy.

In Conclusion, By following these steps, you can successfully back up your iPhone to an external hard drive using iTunes on your Mac. Storing your iPhone backups on an external hard drive provides an extra layer of data protection and flexibility for accessing your backups when needed.

- Advertisement -

4 Ways of Transferring Files From Android to Mac

0

Transferring files from an Android device to a Mac can be done through various methods, each offering different levels of convenience and efficiency. Here are four common ways to transfer files from an Android to a Mac:

1. Using Android File Transfer (AFT):

  • Download and install Android File Transfer on your Mac from the official website.
  • Connect your Android device to your Mac using a USB cable.
  • Open Android File Transfer on your Mac to access your Android’s files.
  • Simply drag and drop files from your Android device to your Mac to transfer them.

2. Using Google Drive or Cloud Storage:

  • Upload the files you want to transfer from your Android device to Google Drive or any cloud storage service.
  • Access the same cloud service on your Mac by visiting the web interface or using their app.
  • Download the files from the cloud storage to your Mac.

3. Using Bluetooth:

  • Turn on Bluetooth on both your Android device and Mac.
  • Pair the devices using Bluetooth settings.
  • You can then send files from your Android device to your Mac wirelessly.

4. Using AirDroid:

  • Download and install AirDroid on your Android device from the Google Play Store.
  • Create an account or sign in to your existing account.
  • Go to web.airdroid.com on your Mac’s browser and sign in with the same account.
  • Follow the instructions to connect your Android device to your Mac wirelessly.
  • You can now transfer files between your Android device and Mac through the AirDroid web interface.

In Conclusion, Each of these methods offers a way to transfer files from your Android device to a Mac with varying levels of simplicity and speed. Whether using a direct USB connection, cloud storage services, Bluetooth, or AirDroid for wireless transfer, you can choose the method that best suits your preferences and requirements.

- Advertisement -

How to Fix An iPhone That Won’t Turn Off

0

Encountering an issue where your iPhone won’t turn off can be concerning, but there are several steps you can take to address this problem. Here’s a guide to help you troubleshoot and fix an iPhone that won’t power off:

Steps to Fix iPhone Not Turning Off:

1. Force Restart Your iPhone:

Perform a force restart on your iPhone by quickly pressing and releasing the Volume Up button, then quickly pressing and releasing the Volume Down button. Finally, press and hold the Side (Power) button until the Apple logo appears.

2. Turn Off AssistiveTouch (if enabled):

If you have AssistiveTouch enabled, try turning it off. Go to Settings > Accessibility > Touch > AssistiveTouch and toggle it off.

3. Check for Stuck Buttons:

Ensure that none of the physical buttons on your iPhone are stuck or malfunctioning, as this could prevent the device from powering off properly.

4. Update iOS:

Make sure your iPhone is running the latest version of iOS. Go to Settings > General > Software Update to check for and install any available updates.

5. Check for Unresponsive Apps:

If an app is unresponsive and causing the issue, try force quitting the app by double-clicking the Home button (for iPhones with a Home button) or swiping up from the bottom of the screen and holding briefly (for iPhones without a Home button), then swipe up on the app to close it.

6. Reset All Settings:

Resetting all settings on your iPhone can sometimes resolve software-related issues. Go to Settings > General > Reset > Reset All Settings. Note that this won’t delete your data but will reset settings like Wi-Fi passwords and wallpaper.

7. Contact Apple Support:

If the issue persists and your iPhone still won’t turn off, it’s advisable to contact Apple Support or visit an Apple Authorized Service Provider for further assistance.

In Conclusion, By following these troubleshooting steps, you can hopefully resolve the issue of your iPhone not turning off. From force restarting the device to checking for software updates and addressing possible hardware issues, these steps aim to help you get your iPhone functioning properly again.

- Advertisement -

No Sounds on Windows 11? Here’s How to Fix It

0

It can be frustrating when you encounter sound problems on your Windows 11 device. Here are some steps to help you troubleshoot and fix sound-related issues:

Steps to Fix Sound Problems:

1. Check Volume Settings:

Firstly, ensure that the volume on your Windows 11 device is not muted or set too low. Adjust the volume using the volume icon in the system tray or the keyboard shortcuts.

2. Restart Your Computer:

A simple restart can sometimes resolve sound issues by refreshing system processes and configurations.

3. Check Audio Output Device:

Verify that the correct audio output device is selected. Right-click on the volume icon in the taskbar, select “Open Sound settings,” and ensure the correct device is chosen under “Output.”

4. Update Audio Drivers:

Outdated or corrupted audio drivers can cause sound problems. Update your audio drivers through Device Manager or the manufacturer’s website.

5. Run the Windows Troubleshooter:

Windows 11 has a built-in troubleshooter for audio that can automatically detect and fix common sound issues. Search for “Troubleshoot settings” in the Start menu and select “Additional troubleshooters.”

6. Check App Sound Settings:

Make sure that sound is enabled within the specific application you are trying to use. Check the volume settings within the app itself.

7. Disable Audio Enhancements:

Some audio enhancements can conflict with sound output. Disable any enhancements by right-clicking the audio device in Device Manager and selecting “Properties.”

8. Verify App Permissions:

Ensure that the application you are using has the necessary permissions to access the audio output. Check the app-specific permissions within Windows settings.

9. Check for Windows Updates:

Updates can include fixes for sound-related issues. Check for and install any pending Windows updates through Settings > Update & Security > Windows Update.

10. Reinstall Audio Drivers:

If updating the audio drivers doesn’t resolve the issue, try uninstalling the drivers in Device Manager and then restarting your computer to reinstall them automatically.

In Conclusion, By following these troubleshooting steps, you can address common sound issues on Windows 11 and restore audio functionality to your device. From checking volume settings to updating drivers and running diagnostic tools, these steps can help you diagnose and fix sound problems effectively.

- Advertisement -

How to Fix It When a Mac Is Not Detecting an External Display

0

When your Mac fails to detect an external display, it can disrupt your workflow and productivity. Here are some steps you can take to troubleshoot and resolve this issue:

Steps to Fix External Display Detection Issue:

1. Check Physical Connections:

Ensure that the cables connecting your Mac and the external display are firmly plugged in at both ends. Try reseating the cables to ensure a secure connection.

2. Restart Your Mac and the External Display:

Turn off both your Mac and the external display. Then, power them back on, allowing both devices to establish a fresh connection.

3. Press the Detect Displays Shortcut:

On your Mac keyboard, press Command (⌘) + F2 or Command (⌘) + F1 to trigger the “Detect Displays” function. This key combination can sometimes force the Mac to recognize the external display.

4. Check Display Preferences:

Go to System Preferences > Displays on your Mac. Ensure that the external display is recognized and configured correctly in the display settings.

5. Try Different Ports or Adapters:

If possible, connect the external display to different ports on your Mac or use a different adapter. Sometimes, a faulty port or adapter can cause detection issues.

6. Update macOS and Drivers:

Make sure your Mac is running the latest version of macOS. Check for software updates in System Preferences > Software Update. Also, ensure that display drivers are up to date.

7. Reset NVRAM or PRAM:

Restart your Mac and immediately press and hold Option + Command (⌘) + P + R to reset the NVRAM or PRAM. This can resolve various hardware-related issues.

8. Check Power Saving Settings:

In System Preferences > Energy Saver, disable power-saving features like “Automatic graphics switching” that may interfere with external display detection.

9. Use Safe Mode:

Boot your Mac into Safe Mode by restarting and holding the Shift key. Safe Mode helps diagnose and fix various issues, including external display problems.

10. Consult Apple Support:

If the issue persists, contact Apple Support or visit an Apple Authorized Service Provider for more advanced troubleshooting and potential hardware diagnostics.

In Conclusion, By following these troubleshooting steps, you can address the issue of a Mac not detecting an external display and potentially restore your external monitor functionality. Ensuring proper connections, software updates, and configuration settings can help resolve common display detection issues.

- Advertisement -

How to Sync Your iPhone and iPad

0

Syncing your iPhone and iPad allows you to ensure that both devices have the same content, settings, and data, providing a seamless experience across your Apple devices. Here’s how you can sync your iPhone and iPad:

Using iCloud for Syncing:

1. Enable iCloud on Both Devices:

Go to Settings on your iPhone and iPad, tap on your name at the top, then select iCloud. Ensure that iCloud is enabled and that you are signed in with the same Apple ID on both devices.

2. Select Data to Sync:

In the iCloud settings, choose the types of data you want to sync between your devices, such as Photos, Contacts, Calendar, Notes, and more.

3. Use iCloud Backup:

Turn on iCloud Backup to automatically back up your iPhone or iPad data to iCloud, ensuring that both devices have the same content and settings.

4. Sync Photos with iCloud Photo Library:

Enable iCloud Photo Library to keep your photos and videos updated across all your Apple devices, ensuring a consistent photo library.

Using iCloud for Continuity Features:

1. Handoff:

With Handoff enabled, you can start an activity on one device and pick up where you left off on the other seamlessly. Ensure Handoff is enabled in Settings > General > Handoff on both devices.

2. AirDrop:

Use AirDrop to share files, photos, and more between your iPhone and iPad. Ensure AirDrop is enabled in Control Center on both devices.

Using iTunes/Finder for Backup and Sync:

1. Connect Devices to Computer:

Connect your iPhone and iPad to your computer using a USB cable and open iTunes (or Finder on macOS Catalina and later).

2. Select Devices:

In iTunes or Finder, select your iPhone and iPad when they appear.

3. Choose Sync or Backup:

You can choose to sync select content like music, videos, or apps between the devices, or perform a full backup of both devices on your computer.

4. Apply Changes:

Click on Sync or Backup to apply the changes and ensure both devices have the same content and settings.

In Conclusion, By utilizing iCloud for seamless data synchronization and iTunes/Finder for backups and content sync, you can ensure that your iPhone and iPad are in harmony with each other, providing a consistent experience across devices. Whether it’s sharing photos, contacts, or preferences, syncing your devices ensures a unified Apple ecosystem experience.

- Advertisement -

How to Capture an iPad Screenshot

0

Taking screenshots on an iPad is simple and can be useful for saving information, sharing content, or keeping records. Here’s how you can capture a screenshot on your iPad:

Steps to Capture a Screenshot:

1. Press Buttons Simultaneously:

Press the Home button (if your iPad has one) and the Top button (Power button) simultaneously. These buttons are usually located on the front and top edges of the iPad.

2. Hear Shutter Sound (if sound is enabled):

After pressing the buttons, you should hear a camera shutter sound (if sound is turned on) to confirm that the screenshot was taken.

3. View Screenshot Thumbnail (Optional):

A thumbnail of the screenshot will briefly appear in the lower-left corner of the screen. Tapping on the thumbnail allows you to edit or share the screenshot immediately.

4. Access Saved Screenshots:

Your screenshots are saved in the Photos app under the Screenshots album, making them easily accessible for viewing, editing, or sharing.

Additional Tip:

  • If your iPad doesn’t have a Home button (like newer iPad Pro models), you can capture a screenshot by pressing the Top button and the Volume Up button simultaneously.

In Conclusion, Capturing screenshots on your iPad is a quick and convenient way to save and share content from your device. Whether you need to capture important information or share content with others, knowing how to take a screenshot can be a handy feature. Feel free to snap away and store those memorable or essential moments on your iPad

- Advertisement -

How to Know If Someone Has Blocked You on Snapchat

0

Identifying if someone has blocked you on Snapchat can be challenging since the app doesn’t explicitly notify users when they’ve been blocked. However, there are a few signs that might indicate you’ve been blocked:

Signs of Being Blocked on Snapchat:

1. Unable to Send Snaps or Messages:

If you can no longer send snaps or messages to the suspected user, it could be a sign that you’ve been blocked.

2. Profile Visibility:

When you search for the user’s name in the Snapchat search bar, their profile might not appear in the results, indicating a possible block.

3. No Activity Updates:

Lack of activity updates or score changes from the suspected user in your Snapchat friends list might suggest a block.

4. Failed Calls or Video Chats:

If attempts to make calls or start video chats with the user fail consistently, it might indicate a block.

5. Messages Not Delivered:

Messages sent to the suspected user remain stuck at the “pending” status without getting delivered.

Additional Steps to Confirm:

  • Ask a Mutual Friend: Enlist the help of a mutual friend who is also connected with the suspected user on Snapchat to see if they can locate their profile.
  • Check from Another Account: If possible, use a secondary Snapchat account or ask a trusted friend to search for the suspected user’s profile to confirm their status.

In Conclusion, Detecting if you’ve been blocked on Snapchat involves observing changes in messaging capabilities, profile visibility, and interaction behaviors. While Snapchat doesn’t provide explicit notifications for being blocked, the signs mentioned above can indicate a potential block. Remember, communication issues can also arise due to network glitches or the user’s own settings, so it’s best to confirm the block through multiple indicators.

- Advertisement -

Recent Articles

Trending Now