Home Blog Page 40

How to Turn Off Android Phone Sensors

0

Android phones are fixed with a different types of sensors that turn a simple device into a smart device or what we call a Smartphone. Hackers can make  use of these sensors to log your keystroke, put on the camera, or record audio. Thankfully, with Android 10, Google has resolved this difficulty by introducing a new feature that enables you to disable all sensors in Android with one tap.

This article explains how to turn off sensors on Android by tapping a single button. It also explains what’s affected when you do so.

How to Turn Off All Sensors on Android Smartphone

The choice to perform the aforementioned task is carried out through a Quick Settings toggle. However, the quickest way to switch off all sensors at once is with sensors off, which is a toggle you can allow through developer option. So follow these steps below to bring up the Developer options and hence the toggle to turn off all sensors on Android. 

STEP 1: Enable USB Debugging

1.Go to the Settings page on your phone.

2.Then go to the About Phone section and click on Build Number 7 times.

3.This will come up with a toast message that You are now a developer.

4. So return to Settings, go to system and click on Advanced.

5. You should see the Developer Options there. Now making use of this option, we would turn off all the sensors on your Android device. Follow along to the next step.

STEP 2: Enable Sensors Off Toggle

1. Once you are in the Developer Options, go to the Quick Settings Developer Tiles option.

2. Once you are there, you should see the Sensors Off option. Enable that toggle.

3. As soon as you do so, you should now see the Sensor Off toggle in the Quick Settings panel.

4. Just click on it once and it will disable all the sensors, which includes the gyroscope, proximity sensor, compass, accelerometer, and others.

What Does ‘Sensors Off’ Do? 

Switching Sensors Off to the on position will activate this function, which turns off all sensors. Which means the microphone, camera, accelerometer, gyroscope, proximity sensor, magnetometer, and more can’t be accessed by the phone or your apps.

Here are some examples of what that means:

If you open it to take a picture or video, The Camera app will crash and other apps that need the camera might display an error.

  • Audio recording apps will “record” silence.
  • The Fit app will not be able to locate your heart rate.
  • Automatically, The brightness level won’t adjust.
  • Apps like Google Maps won’t know which way you’re facing (you still need to turn off location services if you want to stop location tracking).
  • The lock screen won’t automatically display when you turn the phone over to look at it.
  • Wi-Fi and mobile data will be shut off but you can still make use your phone,but your keyboard will work essentially the same (aside from mic access), the speakers will still transmit audio, and all other apps unaffected by disabled sensors will work normally.
  • You are actually free to switch sensors on and off at any time, as many times as you want. The sensors stop Immediately after tapping the toggle, (or start) reporting data to the system and apps. For example, if you’re recording audio, and you toggle sensors on and off over and over again, the recording will show muted spaces each time the sensors were off.

In Conclusion, Introducing the Android 10 has revealed a world of new possibilities, as it gives excellent additional features by which you can easily customize the interface of your Android phone the way you wish. With the introduction, Google has not only improved the features and security and privacy of the operating system, it has also introduced hidden features and the turn off all sensors on your Android phone which is one of those hidden features that can help you to increase the privacy factor that can come in as a great handy feature. 

Although it can be easy to use to a person who is a bit of an expert in this field but an amateur will have problems using a phone with the turn off all sensors on your Android phone feature that is why Google has hidden this feature. Though the feature, turn off all sensors on your Android phone, is not used on a daily basis but can be a great useful feature as it helps to increase the privacy of your Android device.

- Advertisement -

How to Connect Your Android Phone to Alexa

0

You can make use of your Echo device along with your Android phone, which will give you more control over Alexa. Alexa is the name of the virtual assistant of an Amazon Echo or Amazon Echo Dot smart speakers.

There are numerous reasons why you might want to know how to use Alexa on an Android phone. Perhaps you need to test the smart locks in your home while you are stuck in the office. Or perhaps you need to send a message to someone who also has an Amazon Echo. 

No matter the reason, the usage of Alexa on an Android adds another layer of convenience to your day. This article will teach you how to use Alexa on an Android phone. Follow the steps below: 

How Do I Connect My Android Phone to My Alexa? 

Connecting your Android phone to Amazon’s Alexa assistant is usually carried out in two ways: the app or by pairing it with a tool.

The first method needs you to take in the Alexa app in your telephone to set up the assistant by way of it. Follow the steps below to start out using Alexa together with your Android telephone.

  1. Open the Alexa App. But if you haven’t , set it up from the Google Play retailer, and register to your Amazon account.
  2. Choose the consumer which can use this system.
  3. Click the Alexa button on the prime of the display and permit the permissions to entry your telephone’s microphone
  4. You can now use Alexa through pressing the button or via the usage of one of many wake phrases (“Alexa,” “Ziggy,” “Computer,” “Echo,” or “Amazon”) to start out the assistant.

How to Set Up Alexa on Your Android

1.Go to the Google Play Store. This is in the apps section of your device. 

2.Look for the Amazon Alexa app. You can type the complete name to search, but “Alexa” alone will work as well. 

3.Click install. Give the time to download. After the app is installed, you can then set up the app to connect to your Amazon account. 

4.When it’s carried out, return back to the home screen and tap the app to set it up.

5. Log in with your username and password from your Amazon account. 

6. Then click the Get Started button. 

7. Under Help Alexa Get to Know You, pick your name. If you don’t see your name, you will need to click I’m Someone Else and type in your information. Click continue when done. 

8, Tap Allow or Later if Amazon request permission to add your contacts. If you allow it, connecting with family or friends through the device will be easier.

9. Log in using your username and password from your Amazon account. 

10. Then tap the Get Started button. 

11. Under Help Alexa Get to Know You, choose your name. If you don’t see your name, you will need to tap I’m Someone Else and type in your information. Click continue when done. 

12 Tap Allow or Later if Amazon asks permission to upload your contacts. If you allow it, connecting with family or friends via the device will be easier.

13. Verify your phone number if you wish to send and receive calls using Alexa. To confirm, you will obtain an SMS with a verification code. Enter this code and click Continue. If you don’t want to use this feature, tap Skip.

Now that you’ve downloaded, installed, and set up your Alexa on your Android device, it’s time to begin using it!

How Do I Connect My Android Phone to an Alexa Device? 

If you wish to make use of your Android device with an Alexa-powered device, like an Echo Dot or Echo Show, then you will need to pair it with the device. This can also be carried out through the Alexa app. Follow the steps below to pair your Android phone to the Alexa device. This will allow you to stream music and other audio through the Echo device.

1. In the Alexa app, navigate to Devices.

2. Click Echo and Alexa near the top of the screen.

3. Choose the Echo device you will like to connect to and select Connect a Device.

4. On your Android device, open Settings and ensure Bluetooth is enabled. It may be listed under Bluetooth Connections on some devices like the Pixel 4A.

5. Tap Bluetooth to open a list of available devices, and then tap on the Echo device in the list.

Once your Android phone is connected to your Echo speaker, you can stream audio to the speaker from your phone and use it as a Bluetooth speaker. You can also interact directly with Alexa by pressing the Alexa button or using one of the wake words like “Alexa,” “Ziggy,” “Computer,” “Echo,” or “Amazon.”

- Advertisement -

How to Turn Off RTT on iPhone

0

Real-time text (RTT) is an advanced smartphone communication feature that transmit audio as you enter text to assist individual with speech and hearing difficulties. If it isn’t needful, but it’s enabled on your iPhone, you should switch it off and continue to receive ordinary calls. 

This article will explain how to turn off RTT on an iPhone, including an explanation of what RTT is and why you might need to use it.

How to Remove RTT From iPhone 

Real-time text (RTT) is an iPhone feature that you can’t remove but, but you can switch it off if you don’t need it. The feature is enabled in your iPhone’s accessibility settings.

Here’s how to turn off RTT on an iPhone:

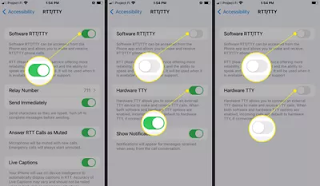
1. Open Settings.

2. Scroll down, and click on Accessibility.

3. Scroll down, and click on RTT/TTY.

4. Tap the Software RTT/TTY toggle to disable it.

 5. Tap the Hardware TTYtoggle to disable it if necessary 

6. RTT and TTY are now disabled on your iPhone.

Note: To allow  RTT/TTY again in the future, navigate to Settings > Accessibility > RTT/TTY, and tap the RTT/TTY toggle to turn it back on.

What is RTT/TTY on iPhones? 

RTT is a feature which you can access on your iPhone that enables you  to make and receive phone calls on your device using text instead of voice. This feature has the ability to convert voice to text and text to voice, and it looks like a text message on your end. The text of calls made using RTT/TTY is also saved and is available for searching and studying after the call ends.

When you make a voice call with RTT enabled, you have the choice of making an RTT/TTY call in preference of a regular voice call. If your carrier supports it, calling this way allows you to enter text in the message field during the call, and the system reads that text to the person you called. Their answers are automatically transcribed into text and displayed on the screen where you can read and respond.

RTT/TTY doesn’t require any extra hardware on iPhones, but if you have a physical teletypewriter device, you may connect one.

Who Is RTT For? 

RTT/TTY is available go everyone since it is a standard feature on iPhones and doesn’t need any additional hardware or accessories. However, this feature is particularly created for iPhone users who are deaf, hearing issue, have difficulty speaking, or who can’t speak at all. These users would typically need to place and receive calls using a telecommunications device for the deaf (TDD) or teletypewriter (TTY) to place calls, or rely on text-based methods of communication like SMS.

Why Turn Off Real Time Text?

Real Time Text is a software that allows users who are deaf to communicate in real time using text. Though it can be able to be a advantageous tool among some, other users may find it not needed for their essential. Below are some of the reasons why some other users should turn off RTT on iphone:

1.You do not communicate through text and prefer alternative ways such as phone conversations or live discussions.

2.RTT doesn’t make your conversation fast  or is generally not comfortable for you. You don’t like the the thought of using text to interact in real time as well as prefer to type messages beforehand.

Should TTY get on or off?

There isn’t anyone size fits all solution to the present question. Every person’s desires and choice can be different, therefore it’s very important to decide what you wish and wish once creating this call.

Some folks might like using TTY for communication as a result of it is tougher to browse and sort on a video display than on a phone. Others might notice that they’re able to communicate a lot effectively by talking on the phone.

- Advertisement -

How to Stop Sending Duplicate Text Messages on Android

0

Android gadgets have the very best range of customers nowadays who experience the benefit of those smartphones however not without a few troubles like android sending replica messages. It may be a nuisance to the receiver and the sender, explaining why many android customers are after understanding the way to prevent android from sending double textual content messages.

First, it’s worth nothing that android sending duplicate text messages should bring about many troubles, which includes issues with the phone, invalid sim card, and third-party messaging apps. Since there are numerous reasons of android sending double text messages, there are similarly many methods to fix them. This article helps you know to restore the android phone that continues sending a couple of text messages, however let’s first see the reasons that causes the mistake in the first place.

The Cause of Duplicate Text Messages on Android 

Several issues can cause an Android phone to send double text messages however typically, the difficulty has a tendency to fall into numerous vast categories.

  • An issue with your Wi-Fi or cell statistics network
  • A wrong placing in the messaging app
  • A problem with the messaging app
  • A problem together along with your Android tool

In most cases, double text messages are as a result of the primary  of those 4 issues. If this is the case, it could be resolved quickly. Problems with an app or tool, however, are greater tough to restore.

How to Fix Duplicate Text Messages on Android 

Follow the steps below to prevent sending double text messages on Android. Be certain to observe the listing in order, because the most likely answers are positioned first.

1. Turn Wi-Fi off and turned on again. A weak Wi-Fi connection could cause an Android phone to attempt re-sending a message after it was already sent, inflicting a duplicate message.

2. Switch off mobile data and returned on again. As with Wi-Fi, a weak data and connection might also cause an Android device to attempt re-sending a message that was already sent.

3. Find a place with better mobile data reception. Turning Wi-Fi and mobile data on and go into reverse may not solve the difficulty if you are in a place with terrible reception. Move to a place with better reception, if possible.

4. Turn off Automatically resend as text (SMS/MMS) in the Messages app.

  • The setting is positioned under Settings > Chat Features in the Messages app. Third-party messaging apps commonly have a comparable characteristic, even though the characteristic can be categorized differently.
  • This features resends a message as an SMS/MMS message if it believes the message did not send over Wi-Fi or mobile data. An Android device might also do so incorrectly even if a message was successfully sent, inflicting a duplicate message.

5. Turn off Enable chat features in the Messages app.

  • The setting is positioned under Settings > Chat Features in the Messages app. Third-party messaging apps commonly have a comparable characteristic, even though it is able to be categorized differently.
  • Chat Features makes use of Wi-Fi or mobile data to send a message rather than SMS services. This is commonly favored however should cause duplicates in case your Android device mistakenly attempts to do each at once.

6. Clear the messaging app’s cache.

  • The setting is positioned in the Settings app under Apps > Messages > Storage & cache.
  • The cache is used to save numerous configuration data for an app. Clearing it is going to restore transient issues inflicting duplicate messages.

7. Reboot your Android device. A reboot will pressure all apps to shut and could reset most data saved in RAM, which can clean a transient hassle inflicting duplicate messages.

8. Reinstall your messaging app. Removing and re-putting in the messaging app might also prove a hassle, however it begins the app with a easy slate. This should resolve the hassle inflicting duplicate messages.

9. Switch messaging apps. The hassle is probably as a result of a bug in the messaging app to your Android device . Using a distinctive messaging app should restore the difficulty.

10. Remove and reinsert the SIM card on your Android device. The SIM card is used to speak with your mobile data  company, so any difficulty with the SIM card may cause  duplicate messages. Reinstalling the card may resolve the problem .

11. Factory reset your Android device. A factory reset will return your Android device’s software program and firmware to like-new condition. This might also solve the problem.

Note: A factory reset will eliminate all data out of your Android device. Be sure to backup your Android device’s important files before you reset the device .

12. Contact your mobile data company. Though rare, it is possible your mobile data company is the source of duplicate text messages. Contact the company’s customer support for help troubleshooting the difficulty.

- Advertisement -

How to Hide IP Address on iPhone

0

Nowadays, online safety is a massive deal in the digital world. There are methods to browse the Internet anonymously, By hiding your IP address, you can keep people from figuring out your geographical place or keep advertisers from monitoring your on-line activity. Which means no more disturbing advertisements and pop-ups, and you could surf the net free from distractions (and monitoring).

This article offers explanation on how to to make use of the built-in tools to cover your IP address on iPhone and what occurs while you do that.

1.Hide IP Address from Trackers on iPhone Safari Browser

If your iPhone is running on iOS 15 or above, the choice to Hide IP Address from Trackers have to be enabled with the aid of using default for your device.

Go to Settings > Safari > scroll down to “Privacy & Security” segment and faucet on Hide IP Address.

On the text screen, make sure the Trackers option is selected.

2. Hide IP Address from Websites on iPhone Safari Browser

If you’ve got a paid iCloud Account, you will be able to Hide IP Address from each web sites and Trackers even as the use of the Safari browser for your iPhone.

Open Settings > faucet on Apple ID > iCloud> Private Relay and pass the toggle next to Private Relay to ON position.


After allowing Private Relay, move to Settings> Safari > Hide IP Address > select  Trackers and Websites alternative on the following screen.

This will make your IP Address hidden to each internet site and acknowledged trackers.

3.Hide IP Address on Mac Safari Browser

Open Safari browser for your Mac > select Safari tab in top-menu bar and select Preferences in the drop-down menu.

On Preferences screen, switch to Privacy tab and check the little box next to Hide IP Address.

If you’re subscribed to the paid model of iCloud, click on on the Down Arrow next to Hide IP Address and select from Trackers and Websites alternative.

If you do not  see from Trackers and Website alternative, make certain the Private Relay is enabled on your iCloud Account.

How to Hide Your IP Address on iPhone Using iCloud Private Relay 

While Safari is how trackers track your IP, it is not the only way. Advertising trackers may be inserted invisibly into emails despatched to you. Apps can do all styles of monitoring, along with your IP, to assist create consumer profiles which can be bought to goal ads (App Tracking Transparency can assist with this). So, in case you’re virtually extreme approximately hiding your IP and preserving your privateness, you want to take any other step.

Apple’s iCloud Private Relay is much like a VPN (Virtual Private Network) and may conceal your IP address with. It’s protected with all paid iCloud+ plans (which begin as little as US$0.99/month). When iCloud Private Relay is enabled for your iPhone, your IP address with is hidden from everyone—even Apple!

To permit iCloud Private Relay, first make sure you’ve got iCloud+ after which observe those steps:

1. Tap Settings.

2. Tap [your name].

3. Tap iCloud.

4. Tap Private Relay.

5. Move the Private Relay slider to on/inexperienced.

6. Tap IP Address Location.

7. This helps you to manipulate how your iPhone appears to trackers and web sites. This is vital in case you want to be in a certain country  and/or time zone to apply sure web sites or packages. Tap either Maintain preferred place or Use country y and time zone..

Other Ways to Hide Your IP Address on iPhone 

The  strategies mentioned above are clean and effective methods to cover your IP address on your iPhone, however they’re not only  the option. Some different alternatives to consider include:

  • Mail Privacy Protection: This function constructed into iOS 15 and above blocks advert trackers which can be invisibly embedded in emails. permit it by going to adjustment  , Match , Privacy protection > move protection mail activityOn/green the slider.
  • Hide IP in Cellular Settings: You can block advert trackers in each Mail and Safari with simply one setting. move for Adjustment , cell , cell facts alternatives > pass Limit IP address with monitoring On/green the slider.
  • VPN: When you connect with the Internet the use of a VPN, all of the data you send and receive is routed via a highly steady VPN connection. It hides your IP. As referred to above, iCloud Private Relay is much like a VPN, however you could additionally join paid VPN services.
  • Advert blocker: If you’re most worried about hiding your IP address from advert trackers, the above recommendations about Safari and Mail might be of great assist. If you need to move one step further, set up a third-party advert blockading app. Make sure the one you pick can block trackers.

In conclusion, Blocking your IP is a beneficial privateness degree that generally may not give you problems. However, there are a few conditions in in which you need your IP to be detected. For instance, in case you join a streaming carrier that gives exclusive content material in exclusive countries, the carrier may also use your IP to decide what country you are in. 

If it cannot do that, it could block your access. Some work programs and tools also depend on seeing that you are connected to an internal company owned IP. In those cases, you may want to disable your IP address with blockers.

- Advertisement -

What Is the Screen Door Effect?

0

The screen door effect (SDE) is a visible impact that occurs when you are capable of make out the individual pixels on a show. When you can see the gap among individual pixels in a photo, it is able to appear like you’re viewing the photo thru the nice mesh of a display door. The display door impact is specially obvious in digital reality (VR) because of the near proximity among your eyes and the VR show. 

Why does the Screen Door Effect happen?

SDE takes place due to the fact our eyes are so close to the flat panel show, and people shows use pixels. Between every pixel there’s a small quantity of area that isn’t always lit, and those black little dots appear to be a display mesh door, ensuing in the impact. 

It’s really well worth noting that the Screen Door Effect does now no longer strictly arise on VR headsets and may be located on different varieties of shows. How ever, due to the fact our eyes are so near the VR show, it is lots extra noticeable, as you’re capable of pinpoint precise pixels plenty extra than you’ll on a TV or laptop monitor. 

What Does the Screen Door Effect Look Like? 

If you’ve got a display door or a window display in your house, you could approximate the display door impact with the aid of using searching at the sector outdoor your house thru the display. Instead of the unbroken photo that you’d see if the display have been removed, the sector is obscured with the aid of using a grid of black lines. The impact is more potent in decrease decision shows and may be very faint, or unnoticeable whilst the show decision may be very excessive.

You can enjoy the identical impact when viewing most monitors, TVs, and telephones in case you location your face near sufficient to the show. If you’re capable of see a black void among individual pixels when you place your face near the display, that’s the display door impact. If you can’t, meaning the decision of the show is excessive sufficient that the pixels are so intently crowded collectively that your eyes can’t make out the individual pixels.

Does VR Still Have the Screen Door Effect?

Early VR headsets just like the Oculus Rift have been infamous for a totally said display door impact due to the fact they made use of pretty low decision shows located in very near proximity to the viewer’s eyes. Most of the VR headsets available in the marketplace have a few degree of display door impact, and the extent to which you’ll enjoy the impact is without delay depending on the decision of the headset. 

High-give up headsets that consist of dual 4K screens or an 8K show are capable of correctly dispose of the display door impact, and the impact may be very tough to understand in headsets constructed round 5K shows. Headsets with show resolutions decrease than which can be likely to showcase a few degree of display door impact.

How Do You Stop a Screen Door Effect? 

To prevent the display door effect with a pc monitor, television, or phone display, there are  alternatives. The simplest choice is to view the show from a sufficient distance in order that your eyes are not able of make out the individual pixels. 

In most cases, that may be done with the aid of keeping your phone similarly out of your face or shifting your sofa similarly out of your TV. The different choice is to shop for a brand new tool with a excessive sufficient decision that you could view it from the favored distance with out being capable of make out the man or woman pixels.

For example, you could take a sit closer to a 4K display than a 1080p display without experiencing the display door impact. Apple Retina shows are mainly designed with this cause in mind, however any show with a sufficiently excessive pixel density, or pixels in line with inch (PPI), can have the same impact.

In digital reality, the simplest manner to prevent the display door impact is to shop for a headset with a sufficiently excessive decision. High-end 8K headsets that offer a separate 4K display for every eye absolutely remove the display door impact, however extra less costly alternatives get quite near.

- Advertisement -

4 Streaming Apps Available on Switch

0

The Nintendo Switch is the uncommon modern video game console designed almost exclusively to play games. The switch gives very few streaming apps or other media features unlike the PlayStation 5 or Xbox Series X. You won’t find Netflix on the Switch or most major streaming platforms, for that matter.

However, Below are the rundown of the best streaming apps you can use on Switch right now.

1. Best App for Movies and TV: Hulu

The Hulu app is the the only major streaming service currently available for download on Nintendo switch, it is available for free, though you will need to buy subscription to use the Disney-owned service that lets you watch thousands of movies and TV shows. You can add live TV and premium networks like HBO and Starz for an additional cost.

The Hulu app for Nintendo Switch is only accessible in the US which makes sense, since Hulu doesn’t serve any other territories. The cheapest Hulu plan costs $5.99/month, which is supported by ads.

2. Youtube

If you own a switch and you want to watch videos without spending any money, YouTube is the place to go. 

The YouTube app for Nintendo Switch is a simple media player that arrived available in the eShop in the year 2018. The app lack features you will find available on other platforms, When it provides open access to all of your preferred material on YouTube. You won’t be allowed to upload videos, and if you are a member to YouTube TV, you won’t be allowed to access the service through Switch either.

3. Funimation: For Anime Fans

You don’t need to be worried about where to watch your favorite show on switch If you’re an anime fan, With the introduction to Funimation, you can now start streaming hundreds of anime on your gaming device.

This popular app is a streaming application that provides English-dubbed anime along with English, Spanish, and Portuguese. Free and paid plans are available, but we can only enjoy two weeks of their free trial.

Unfortunately, not all countries/regions can access Funimation. Nevertheless, the application is available in the United States, Canada, Australia, the United Kingdom, and a few other nations.

4. Pokemon TV

Pokemon TV is another cool app available on Switch, and it is a free app that is focused on the popular Nintendo franchise. The app features full seasons of the Pokemon anime series and broadcasts of the Pokemon Trading Card Game tournaments. It also has content for our younger users, including Pokemon-themed sing-along tracks and nursery rhymes.

How do I delete apps on a Nintendo Switch?

Select an app or game to delete then press the + button > Manage Software > Delete Software > Delete. You can download the app again from the eShop if you choose this option. If you want to download the app again by selecting the app icon from the Home screen, choose Archive Software.

How to Get Streaming Apps on Switch

All you need is a Nintendo online account and follow these steps below to download apps on your Switch.

1.From the Switch Home menu, go to the Nintendo eShop icon. 

2.Click the A button.

3.Choose a profile and sign in to your Nintendo Online account.

4.Go to Search/Browse in the left-hand menu.

5. Click on Genre under Browse by Filter.

6.Scroll down to Video and select View More.

You should be able to see all the streaming apps displayed. Select the app you wish to download and click Free Download.

In conclusion, Nintendo Switch is well known among the gaming community but still far behind.  The device needs more streaming services to gain popularity.

On the other hand, PlayStation and Xbox feature lots of streaming devices. So, Nintendo Switch has mountains to climb to compete with these giants.Until 2020, there was hardly any streaming service on Switch. Since November 2021, Nintendo has already introduced three popular applications.

Slowly, we will encounter new services on eShop soon. Indeed, this is just the beginning, as Switch has been improving lately.

- Advertisement -

How to Remove Chat From Windows 11

0

This article will train you two different ways to remove the Chat icon from the taskbar in Windows eleven.

How to Remove Chat from Windows eleven Taskbar

In Windows 11

Windows 11 is here, available as a free upgrade for all Windows 10 customers. While many groups are rolling out the brand new OS in the months ahead, one of the first matters that user will be aware is the Chat icon in the taskbar. Microsoft is making Teams a essential part of the revel in Windows 11 a lot so that they have got baked it without delay into the Taskbar. 

Microsoft nevertheless recommends downloading the total Microsoft Teams app for work or school accounts, leaving the Chat app gathering dirt for your taskbar… with apparently no way to remove it. Fortunately, there is an easy workaround which can narrow down your taskbar and maintain it to the apps and shortcuts which you need. 

How to Remove Chat from Taskbar

There are some new icons at the taskbar in case you just updated Windows 11. Teams is an immediate messaging app that has one in all those. Unlike the Teams app used at academic institutes or workspaces, this one is a touch greater streamlined.

However, that is a private model of Teams, and the brand new Chat app helps you to talk with near own circle of relatives and buddies thru a camera icon. Download the primary Teams application, after which make use of each at the same time.

If you click on at the Chat symbol, you’ll be sent to the Teams app. However, clicking at the Chat button after uninstalling the messaging application will reinstall it. You remove or hide the chat button via way of means of deactivating it for your taskbar. To accomplish this, follow with those steps below:

  • Right-click on an empty area of the taskbar and choose the Taskbar settings option. The new setting window could have Personalization > Taskbar because the pinnacle heading.
  • Find the chat in the taskbar’s item list.
  • To do away with the chat, switch off the slider at the right side. The Chat Button won’t be seen at the taskbar anymore.
  • It’s essential to notice that Microsoft Teams is still present on your pc even though the Chat Button is gone. “Apps & Features” is wherein you’ll discover the app if you want to delete it absolutely.

Remove Chat Icon Via Windows Search Bar 
In the Windows seek bar, type Taskbar Settings,” press the go back key transfer chat to “off.”

Why Did Microsoft Add a Chat Icon to My Taskbar? 

The chat icon was added to the taskbar in Windows 11 to push Microsoft Teams to greater customers. Microsoft has been pushing to make Teams greater adaptable for each groups and individual users. The Chat icon was added to permit users without problems get entry to the Teams application. When activated, you can make calls without problems and send text messages without usage of Microsoft Teams from the Chat icon in Windows 11.

How to uninstall Chat from Teams on Windows eleven

On Windows 11, there are  at-least two ways to uninstall the Chat from Microsoft Teams integration the usage of the Settings app and PowerShell commands.

Settings app method

To absolutely do away with the Chat from Microsoft Teams with the Settings app, use those steps:

1.Open Settings.

2.Click on Apps.

3.Click the Apps & features web page at the proper side.

4.Select the Microsoft Teams app.

5.Click the three-dotted button subsequent to the app and choose the Uninstall button.

6.Click the Uninstall button again.

After you whole the steps, the app could be eliminated from the system, and the closing factor left to do is do away with the Chat button from the Taskbar with the commands mentioned below.

- Advertisement -

The 8 Best Android TV Games of 2022

0

Recently unboxed a fancy new Android TV and searching out a few desirable video games to play? We have you covered. Below are the listing of eight of the great Android TV video games you may download and install this year. These selections covers the gamut from role-gambling video games, racing sims, unfashionable titles, and more.

1. Crossy Road

Crossy Road is a a fun game so that it will keep you hooked for hours at a time. The premise is easy – you simply need to cross roads, at the same time as you keep away from getting hit by traffic (which comes from each directions, on both streets). You additionally want to keep away from going out of the display, because the camera continues panning forward, and also you want to preserve in advance of that. What makes this game so addictive, is probably the fact that you are feeling like it’s clean sufficient while it’s now no longer, and that it calls for you to preserve a fast pace, proper from the begin. Making your way via traffic is tough enough, however the game quickly moves directly to streams that you need to go via way of means of stepping over logs and leaves.

The graphics quality in the sport is intentionally poor, however that’s what provides to the charm of the game. Plus, the fast paced movement, and the clean manipulate scheme makes it lots of a laugh to play. Do note that the sport works higher with the Android TV remote, in place of a gamepad.

2. Real Racing 3

Playing racing games with a gamepad is really interesting, you may try out Real Racing 3. The game comes with sensible graphics and model designs of various logo vehicles like Lamborghini, Mercedes, BMW, and lots of others which we will certainly enjoy. We may even discover new racing tracks from unique international locations to revel in video games in multiplayer mode with pals and family. The realistic graphics and amazing experience provide an amazing experience to enjoy game on massive display.

3. Best for Storytelling: The Wolf Among Us (or Any Other Telltale Game)

What We Like

  • Excellent storytelling and voice acting
  • An interesting setting primarily based on the Fables comic series

What We Don’t Like

  • The death of Telltale Games means there may not be a sequel.

While developer Telltale Games closed in September 2018, unfortunately, you can still download its excellent episodic adventure video games on Android TV. The Wolf Among Us is certainly considered one among its great. Based on DC Vertigo’s award-triumphing Fables comic book series, it follows fairy story gumshoe, Bigby Wolf, as he investigates a gruesome murder. Like most Telltale titles, it features deft storytelling, remarkable voice acting, and harrowing ethical choices. Several different Telltale video games are to be had for Android TV as well, and they may be all really well worth checking out.

4. Dead Cells

Dead Cells made a name for itself as a completely hard roguelike with Souls-like elements. It’s a easy sport at its core, however whenever you die, you are despatched back to the start to strive again. You’ll quickly locate that thing are unique whenever you put out, making for a difficult time.

Don’t allow  that to damage the game for you, though. Though you may locate venture galore, you may additionally locate excellent successes and masses of loot to preserve you busy. Approach every scenario cautiously and you will be simply fine.

5. Asphalt eight: Airborne

Asphalt eight is certainly considered one among my favorite mobile video games. It is  incredibly fun to play, and it even has a multiplayer mode that makes it even higher. On Android TV, the game is available on Play Store and works wonderful on Mi Box. However, the frame rate isn’t always very smooth. You can connect a Bluetooth controller on your Android TV, and Asphalt will automatically detect it and inform you the manipulate scheme in your controller.

While you can play a game with a controller provided with a set-pinnacle box, it makes the game not so exciting.” However, upload a Bluetooth controller and also you’ll have lots of a laugh racing on a massive display to your residing room.

Notes: Although Asphalt 9: Legends is available for Android, the sport remains incompatible with Android TV.

6. Zombie Age 2

The zombie Age 2 is a a fun, side-scroll shooter, with desirable graphics. The game starts with a study of the basic movement and shooting style to follow. Then you quickly throw your self into the field, anticipating to shield your self only with a baseball bat and a gun. The first few ranges are easy, and after you begin unlocking the weapon and essentially begin to experience invincible, you’ll get to a degree that appears nearly not possible to pass.

This game is in reality fun to play, and if you want shooters in which you do not treat yourself in all seriousness, zombie Age 2 that is the best way to spend some time beating zombies on your TV.

7. Best for a Group: Jackbox Party Pack 2

Jackbox Games

What We Like

  • Mini video games perfect for a party setting 

What We Don’t Like

  • It’s highly-priced for a cellular app

As its name suggests, the Jackbox Party Pack 2 is best enjoyed during a social gathering. It features 5 celebration video games: the hit bluffing sport Fibbage 2; the sound outcomes sport Earwax; the absurd artwork public sale sport Bidiots; phrase spark off sport Quiplash XL; and the nail-biting Bomb Corp. Players can use their phones, tablets, or computer systems as controllers, at the same time as spectators can be a part of in via way of means of gambling as target target market members.

8. Smash Road Wanted 2

The subsequent game on the listing is Smash Road Wanted 2, that is one of the famous video games on Android TV. In this game, we need to survive to exist so long as possible with out getting stuck via way of means of the police. The most important point of this game is with being the open global we will engage with the different environments from riding a automobile to leap in the lake you may do it all. Our character can run, swimming and drive, the purpose of the sport is to continue to exist in unique environments. after you are acquainted with this sport you may revel in it on Android TV.

In conclusion, There are many games you can play on your Android TV. However, the eight listed above are part of best games for Android TV that I would personally recommend. These games range from genres like puzzles, adventures, and racing. So, no matter what kind of game you are interested in, chances are that you will find a game to your liking on this list. 

- Advertisement -

How to Fix It When Your Tablet Won’t Turn On

0

There are lots of reasons that could stop your android from turning on, but it doesn’t mean it’s can’t work anymore. In fact, there are a numerous things you can try which may get it back working again. It might be as simple as needing to charge it up again after it’s run out of battery, or it could be something a little more serious.

This article will focus on general solutions which should work on all tablets, whether they’re Android devices from Samsung, Huawei, or Google. Where necessary, specific instructions will also be given for iPads.

Why My Tablet Is Not Turning on

Your tablet might not respond due to different reasons. Below are some possible reasons behind your Tablet not responding to your touch and the screen staying black.

  • Low Battery: Your phone won’t turn on if you have a flat battery because electronic devices like Tablets need the battery’s Power to run. 
  • Water or Hardware Damage: If you have mistakenly dropped your phone on a hard surface or in the water before, your Tablet may damaged due to it, which is why it is not turning on. 
  • Software Malfunction: You device may may not respond If you try to install a third-party app from an insecure app store or you tried installing a new custom ROM. 
  • Display Malfunction: Your device might be turned on, but due to your screen issue, it couldn’t be able to show the information. It can be either caused by hardware or software damage.
  • Heating issue: Your tablet might not respond due to excessive heat If you keep using it while charging or you don’t let your it stay free for a couple of hours. Cool down your phone and only then use it again.

What should I do if my Android won’t turn on?

1. Soft reset

The first thing you should do If you are experiencing this problem is try a soft reset, soft reset gives you the opportunity to restart your phone without getting stuck on the logo screen. The software reset changes from device to device. Normally, it requires you to press and hold the power button for 8-10 seconds, but on some phones, such as the HTC One, Samsung Galaxy Tab 3 and Sony Xperia Z3, you need to press and hold the power button and volume up button for 8-10 seconds. But based on your phone model, one of these options may work.

2. Charging the unit

It is possible that your phone didn’t respond due to a low battery. Sometimes the battery indicator shows a charge of z. B. 25%, although the battery is actually low. Turn off the power completely and charge the unit. Let the device charge for a while and then turn it on. Check that the phone turns on completely and if it does, the problem is solved and you can now use the phone. 

3. Use alternative charging method
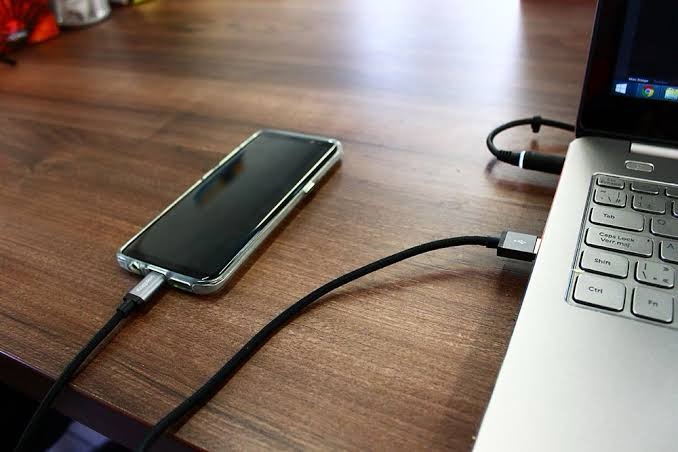
Try using a USB cord If your phone or tablet’s charger is not working, and connect the device to your computer. Try using the wall charger If you have been using a computer to charge your phone and see if it works. And if it doesn’t work, try charging another device, using the same charger if possible, to test if you can charge other devices. 

This will give you the assurance that the problem is with the device or the charger. Make sure the charger or cable are in good condition, unless you have another device to check whether the charger is working or not. Damaged cables may prevent the phone from charging, and if the phone’s battery is low, the phone won’t respond.

4. Replace the battery or replace the batteries

Remove the battery from your device If it doesn’t turn on (if the phone has a removable battery), wait for a few seconds, and then reinstall the battery. If the problem is not resolved by reinstalling the battery, then you have to replace the battery. If you have an extra battery with you, make sure the phone turns on when you change the battery. 

5. Try pressing the power switch – again

I know you have tried pressing the power button, but try more than two or three times.Press the power button a few times after charging the phone to check if there is a problem turning on the phone. If the light is on, check that the power switch is working properly. The problem may be in the way the power switch is connected, and maybe a loose part is causing the problem. Take the phone to a technician who can check the internal wiring of the phone if the power button is not working properly. 

6. Clear cache partition

Clearing your phone’s cache partition will remove cache files that may have become corrupt and caused your phone to fail. Damaged cache files may prevent the phone from responding. These cache files are temporary and will be recreated by the phone after you delete the current cache files. To clear the cache partition, you need to enter recovery mode by pressing a specific key combination. 

The combination may be different for different Android devices. Below are some examples: Samsung: Power button, volume down button, home button. Nexus: On/Off, volume down and volume up button LG: Power button and volume down button HTC: Volume control and power button. To delete the cache partition, do the following:

  • Press and hold the power button, volume down button and home button (on Samsung) at the same time.
  • Once you see the Android icon, release the power button, but hold down the other two buttons until the system recovery screen appears.
  • You will see a menu with many options. Use the Volume Down button to highlight the Clear Cache partition option.
  • Select the option using the power button and the process of clearing the cache partition will begin.

The phone will automatically reboots and new cache files are created by the phone when the process is complete. If you have successfully completed the entire process and the phone is turned on, the problem is solved. If your Samsung Galaxy does not turn on or charge even after clearing the cache, you may want to consider resetting the device to factory settings.

7. Use the PC suite developed by the manufacturer

It is recommended that you connect the phone to your PC and use the PC package developed by the phone manufacture If you experience this problem and your phone does not turn on. Smartphones, for example, have their own software package, depending on the manufacturer of the phone. For example, Samsung smartphones use Samsung Kies and LG phones use LG PC Suite. Similarly, all smartphones are equipped with a PC package. 

With the PC software package, you can perform lot of tasks, such as B. transferring data, synchronizing your device with the connected computer and making backups. Connect your Android to your computer and then transfer all the data If it gets stuck on the home screen, . You can update your phone with the PC package so that if the phone crashes during the update, the update is completed and the phone is rebooted. This can work if the phone turns on, but turns off again after a minute or two. If all else fails, perform a factory reset.

8. Restoring the phone to factory settings

Perform a factory reset: Resetting your Android or iOS tablet can get it working again if a problem with the software is preventing it from starting up properly.

A factory reset erases the entire tablet as if it was brand new out of the box so consider this a last resort.

You will make use of Android or IOS Recovery Mode to do a factory reset when the tablet won’t turn on,

- Advertisement -

Recent Articles

Trending Now